顯示具有 Android 標籤的文章。 顯示所有文章

2015年10月4日 星期日

【Android】Android Studio Support JNI(NDK)

I google ndk + android studio,and  get lots of infomation about how progragming ndk with android studio

Lots of tutorial said that need to put Android.mk and Appliction.mk in jni folder

Now I used Android Stuiod 1.4,and get an excited usage,we don’t need to put above files(Android.mk and Appliction.mk ),just follow below steps ,Android Studio can start programing ndk

1.Download NDK

   First you need to download NDK https://developer.android.com/ndk/downloads/index.html

   (I suppose you’ve installed Android Studio)

2.Define NDK loction

             File => Project Structure => Android NDK location:

             Select where your ndk located

            image


       3.Define jni module name

         add below code in defaultConfit of module build.gradle

ndk{
moduleName "leonjni"
}
image 
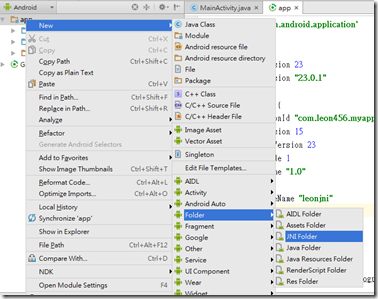
4.Add jni folder
image 
5.Add load library ,add native method,call native method
image 
6.Generate jni code from native method(alt+enter)
image 
7.Change some text in jni file(c file)
image 
8.Run the app,text in jni file had worked.Have fun.
image 


2014年9月24日 星期三

【Android】Add Jars into Android Studio Project

image

image

image


image


Android Studio will add you library to build.gradle script

image

2014年7月1日 星期二

【Android】Add icon to FragmentPagerAdapter

FragmentPagerAdapter 

   1: @Override
   2: public CharSequence getPageTitle(int position) {
   3:     SpannableStringBuilder sb = new SpannableStringBuilder(" Page #"+ position); // space added before text for convenience
   4:     
   5:     Drawable main_create = getActivity().getResources().getDrawable(R.drawable.main_create);
   6:     main_create.setBounds(0, 0, main_create.getIntrinsicWidth(), main_create.getIntrinsicHeight()); 
   7:  
   8:     ImageSpan span = new ImageSpan(main_create, ImageSpan.ALIGN_BASELINE); 
   9:     sb.setSpan(span, 0, 1, Spanned.SPAN_EXCLUSIVE_EXCLUSIVE); 
  10:     return sb;
  11: }

2014年6月22日 星期日

【Android】Android app error - Duplicate id 0x7f04000f, tag null, or parent id 0x0 with another fragment for com.google.android.gms.maps.SupportMapFragment

   1: @Override
   2: public void onDestroyView() {
   3:     super.onDestroyView();
   4:     FragmentManager fm = getActivity().getSupportFragmentManager();
   5:     Fragment fragment = (fm.findFragmentById(R.id.map));
   6:     FragmentTransaction ft = fm.beginTransaction();
   7:     ft.remove(fragment);
   8:     ft.commit();
   9: }

2014年5月13日 星期二

【Android】Google Map Directions(Call Google Map App)


LAT_POSITION  and LONG_POSITION  is source position

lat and lon is target position

   1: Intent intent = new Intent(Intent.ACTION_VIEW, Uri.parse("http://maps.google.com/maps?saddr=" + LAT_POSITION + "," + LONG_POSITION +"&daddr=" + lat + "," + lon));
   2: intent.setComponent(new ComponentName("com.google.android.apps.maps","com.google.android.maps.MapsActivity"));
   3: startActivity(intent);    

2014年5月12日 星期一

【Android】Open Gallary By App

startActivity:

   1: Button btn = (Button)rootView.findViewById(R.id.button1);
   2: btn.setOnClickListener(new OnClickListener(){
   3:  
   4:     @Override
   5:     public void onClick(View v) {
   6:         Intent i = new Intent(Intent.ACTION_PICK,android.provider.MediaStore.Images.Media.INTERNAL_CONTENT_URI);
   7:         final int ACTIVITY_SELECT_IMAGE = 1234;
   8:         startActivityForResult(i, ACTIVITY_SELECT_IMAGE); 
   9:     }
  10: });
  11:  
  12: Button btn2 = (Button)rootView.findViewById(R.id.button2);
  13: btn2.setOnClickListener(new OnClickListener(){
  14:  
  15:     @Override
  16:     public void onClick(View v) {
  17:         Intent intent = new Intent();
  18:         intent.setType("image/*");
  19:         intent.setAction(Intent.ACTION_GET_CONTENT);//
  20:         startActivityForResult(Intent.createChooser(intent, "Select Picture"),10);
  21:         
  22:     }
  23:     
  24: });

onActivityResult:


   1: @Override
   2: public void onActivityResult(int requestCode, int resultCode,
   3:         Intent data) {
   4:     Log.i(TAG, "request code:"+resultCode);
   5:     super.onActivityResult(requestCode, resultCode, data);
   6:      Uri selectedImage = null;
   7:     switch(requestCode) { 
   8:     case 1234:
   9:         if(resultCode == RESULT_OK){  
  10:             selectedImage = data.getData();
  11:             Log.i(TAG, "Uri:"+selectedImage);
  12:             
  13:             /* Now you have choosen image in Bitmap format in object "yourSelectedImage". You can use it in way you want! */
  14:         }
  15:     case 10:
  16:          if(resultCode == RESULT_OK){  
  17:                 selectedImage = data.getData();
  18:                 Log.i(TAG, "Uri:"+selectedImage);
  19:          }
  20:         break;
  21:     }
  22:     
  23:     String[] filePathColumn = {MediaStore.Images.Media.DATA};
  24:  
  25:     Cursor cursor = this.getActivity().getContentResolver().query(selectedImage, filePathColumn, null, null, null);
  26:     cursor.moveToFirst();
  27:  
  28:     int columnIndex = cursor.getColumnIndex(filePathColumn[0]);
  29:     String filePath = cursor.getString(columnIndex);
  30:     cursor.close();
  31:  
  32:  
  33:     Bitmap yourSelectedImage = BitmapFactory.decodeFile(filePath);
  34:     
  35:     this.imageView.setImageBitmap(yourSelectedImage);
  36: }

2013年5月12日 星期日

【Parse.com】Why I like using Parse.com

When I wrote android app,I usually need to write server side code.(I used AppFog for the backend)In my experience,before start coding sever side,I should design Model(or said Er model),then I will create data object correspond with design model.And then I start coding the controller for business logic.(My sever side framework using Spring MVC3)If I need to check the data producing from client.I should add new controller and redirect to its match jsp page.

Now the cloud service Parse.com provide an easy way to above process.

Parse.com provide below function:

  1. Parse Data
  2. Parse Push
  3. Parse Social
  4. Parse Hosting
  5. Cloud Code

And she give us very lots of implementation:

  1. iOS/OSX
  2. Android
  3. JavaScript
  4. Window 8/WP8
  5. .NET
  6. REST API

Its free quota,I thought that it’s enought for small or tiny business requirement:

  1. Request: One million/month
  2. Pushes:  Alos one million/month
  3. Burst Limit 20/second(Ok,I don’t understand what’s that,if u can explain that for me,please tell me,thanks)

Although I did not try all functions,I will tell you that I have already try 2 of the functions in very short time,and that’s very short time I can complete the basis that I need.

First,if you wanna need to do tracing your user what thy do on your app,I thought that you need to get a model(or table) naming  “Floating”(my recently new function for my app,I created a Float Window in  my app,so my table name called “Floating”,and I let my user whether turn off or turn on this function,when then switch the fuction via the button,the app will send a log to the server),in this model I need to define a class,consist 5 columns,then like I said that  I implement a controller and creat a method in controller to make http post to let the app post those fields to the serer.At last I created antoher method to list the created data to a jsp page for showing the datas.After complete above,I turn to android to use HTTPClient to do the client request to send data to server.(HTTPClient code will make you generate about 15~25 lines of code),Now you just only need to do below code

   1: ParseObject floating = new ParseObject("Floating");
   2: floating.put("device_id", 12345678);
   3: floating.put("locale", "zh");
   4: floating.put("enabled", false);
   5:  
   6: floating.saveInBackground();

Then the data have sent to Parse.com server to store.Amazing?


Of course,we need other CRUD data controll,please refer this link to do that:https://parse.com/docs/android_guide#objects 


Remember?,in parse procedure,we did not do any server side code,right?


when you do save for your data,you can check on the dashboard as below(The picture was my another test,the test only contain one column in client,others was create by parse.com)


image


Very soon,right?


Another make me suprise thing is push service,in GCM(Google Cloud Message),I need to go to google console to register the service get appId and add at least 4~5 classe in android project,an……..d code lots controllers or classes in server side(3rd Party Server for controll reqister blah blan…) ,now using Parse.com,you just only do very bit time to do that.


  1. Setup push on android project(Add tag in  AndroidManifest.xml)
  2. Enable push in java code(or said in your activity)
  3. Send message on dashboard(need to send register id to Parse.com when completed above 2 steps)

Please refer this link:https://parse.com/tutorials/android-push-notifications


When you edit your message and click Send a push,your device received message immediately(If choose schedule send now,sure,you can book a spacify time to send that,but you need to upgrade to pro version)


Very soon,right?


Other functions,I did not try.But I thought Parse.com really eliminate lots of comprehensive complex job for us,go to sign up a new account and try it.


And when you go to facebook developer site,we can see facebook have already acquired Parse.com. Nice news.


image

2013年4月23日 星期二

【Android】Check or go to spacified app

   1: String appPackage = "jp.naver.line.android";
   2: Intent intent = getPackageManager().getLaunchIntentForPackage(appPackage);
   3: if(intent!=null){
   4:     startActivity(intent);
   5: }else{
   6:     intent = new Intent(Intent.ACTION_VIEW);
   7:     intent.setData(Uri.parse("market://details?id="+appPackage));
   8: }
   9: startActivity(intent);

2012年5月10日 星期四

【Android】Using Google Maps note

  • Create project need to select 【Google APIs】

        image

  • AndroidManifest.xml need to add below tag

       image

2012年4月16日 星期一

【Unity 3D】enable log for android platform

For now, this is what I am doing to get at least some information:

  • Enable "logcat" profiler in the player settings, under Other Settings (Android tab) of Player Settings.
  • Make sure USB debugging is enabled on the Android device (check under Settings | Development).
  • Run adb through the command prompt (with command line argument logcat) that comes with the Android SDK while running the game on the Android, still connected via USB to the computer.

This gives a tiny amount of profiling information (frametime, number of tris, time spend in in different areas, etc.), and updates as the program is run. (It also displays Debug.Log messages, which is even more useful than the actual profiling information).

You can click on the adb window to pause output, and press enter to resume. I run adb through PowerShell - I don't know pausing / resuming will work otherwise.

2012年4月1日 星期日

【Android】add a layout file into current activity

If layout flie(e.g. layout.xml) need to add to acticity using hardcard,below code is ths example

  1: controlInflater = LayoutInflater.from(getBaseContext());
  2:         View viewControl = controlInflater.inflate(R.layout.control, null);
  3:         LayoutParams layoutParamsControl 
  4:             = new LayoutParams(LayoutParams.FILL_PARENT, 
  5:             LayoutParams.FILL_PARENT);
  6:         this.addContentView(viewControl, layoutParamsControl);

2012年3月28日 星期三

【Android】Development Note

General:

  1. AdMob 4.3.1 need to use bigger than Android 3.2 SDK
  2. android:adjustViewBounds="true" auto scale to all parent
  3. SDK can not find adb.exe,we sould add system enviroment path link to D:\Program Files\Android\android-sdk\platform-tools(platform-tools default not exist)first,and execute SDK Manager for downloading Platform-tools

R17:

  1. jar file need to put into a libs folder in project

Android 3.1出现 android.os.NetworkOnMainThreadException异常 

解决办法:

在onCreate方法中添加如下代码:

  1: public void onCreate() {  
  2:      StrictMode.setThreadPolicy(new StrictMode.ThreadPolicy.Builder()     
  3:             .detectDiskReads()     
  4:             .detectDiskWrites()     
  5:             .detectNetwork()   // or .detectAll() for all detectable problems     
  6:             .penaltyLog()     
  7:             .build());     
  8:      StrictMode.setVmPolicy(new StrictMode.VmPolicy.Builder()     
  9:             .detectLeakedSqlLiteObjects()     
 10:             .detectLeakedClosableObjects()     
 11:             .penaltyLog()     
 12:             .penaltyDeath()     
 13:             .build());  
 14: } 

2012年3月27日 星期二

【Android】Bitmap export to file

    String tmpImg = "Leon456.png"; 
 
    OutputStream os = null; 
    try { 
      os = new FileOutputStream(loc + tmpImg); 
      bitmap.compress(CompressFormat.PNG, 100, os); 
    } catch(IOException e) { 
      Log.e("combineImages", "problem combining images", e); 
    }


2011年9月20日 星期二

作品 - 台灣當日黃金報價(powered by adobe air for mobile)

image

Adobe air on mobile 也出來一陣了

由於每天都有在看黃金行情的習慣,android 上沒有自己覺得合適用的app

於是自己來寫一個試試,順便來練習一下Flex for mibile的開發

目前,並沒有使用到mobile上的feature,只算是基本的認識一下flex for mobile的架構

在寫的過程只有一個感覺,可能是flex的基本原件在mobile上會有效能的影響

(應該蠻有影響的,我使用了DropDownList在device上居然點不到 )

在我使用的版本 4.5.1裡,有非常多的元件沒有,或是找不到,這確實讓一些可想得到的功能

可能需要想一些代替方案,或是需要直接用actionscript自己寫一個元件

好吧,總之先上架分享給anroid 手機可以下載air的朋友吧

這個版本 0.0.1,只能查詢當日有更新行情的資料(有開市),假日點開就看不到行情囉?! 哈

之後再來加強其它想到的功能,有下載的朋友幫忙給的評價囉(不論是好或壞,我承認目前真的非常的陽春)

下載連結如下:https://market.android.com/details?id=air.GoldPrice  

(網頁更新會比較慢有可能還是舊的,由手機直接找的話,會比較快看到新的訊息)


updated 2011/09/21---0.0.4---- 增加美金、台幣選擇及日期往前推、往後推功能(flex mobile 沒有日期元件,先用這個替代),以下為這個版次的預圖

p01p02p03p04

updated 2011/09/25---0.0.7---

         a.加入日報表線圖
         b.加入月報表及線圖
         c.調整選擇功能
         d.日報表及月報表若是無資料自動往前最後一個日(月)有資料日期或月份

p01p02p03p05

2009年5月2日 星期六

Android 手機應用程式設計入門by gasolin

    實作上發現書中問題點筆記
    十四章加入選單
  1. 加上後面這段應可讓真沒寫過java的人更容易入手需覆寫實作Activity的method時可由eclipse 原始碼中【滑鼠右鍵】=>【source】=>【override/implement methods....】即可在選單上選擇找到欲覆寫/實作的method,不用去打這個字,避免打錯
  2. 加了二個function(public boolean onCreateOptionsMenu(Menu menu)、public boolean onOptionsItemSelected(MenuItem item))後在emulator上是需要按了 menu後才會出現所加的menu,以上應該也說明一下
  3. 圖示放到 res/drawable 裡的圖檔檔名除了只接受英文字母、數字、或底線 ................我們看到console 上出現res\drawable\Delete.png: Invalid file name: must contain only [a-z0-9_.],所以對己定義的RegExp為檔案不接受大寫字母(所使用版本為 android-sdk-windows-1.1_r1)ps.1.5版也是。

2008年9月28日 星期日

First 接觸 Android

因應 google要上市了,趕快來接觸一下Android
進入Android的官網,先download再說直趨至 Download the SDK
二件事,第一件就是先下載SDK 選擇了 Windows版本
目前的版本是
Windows android-sdk-windows-1.0_r1.zip

接著就是 使用用熟悉的IDE eclipse裝置 ADT的plug-in
筆者使用的是Eclipse 3.4 (Ganymede),直接透過 Software Updates.... 來做安裝
下載好SDK,直接解壓放在適合的目錄,SDK內有三個目錄
tools/, samples/, 和 others
把Path指向tools,以方便可以 console上直接呼叫執行程式
接著設定eclipse對ADT的位置做設定
eclipse => Windows => Preferences => Android 設定剛剛解壓縮SDK的位置
接著在eclipse 點new就可以看到Android的選項
選擇Android Project,即會出現如下


接著輸入以下資訊
Project Name 專案名稱
Package Name 即java裡的package name
Activity Name 即java的 class name
Application Name 程式標
按下Finish後,即產生如下程式碼(HelloAndroid.java/R.java)及設定檔(AndroidManifest.xml)


先打開HelloAndroid.java


接著加上一段TextView在程式裡